Spring MVC/02.Spring @MVC
[SpringBoot]file upload /download 처리
- -
웹 애플리케이션을 작성하다 보면 파일을 업로드 하거나 다운로드 하는 일은 매우 빈번한 일이다. 이번 포스트에서는 SpringBoot를 이용해서 file을 upload 및 다운로드하는 방법에 대해 알아보자.
프로젝트 구성
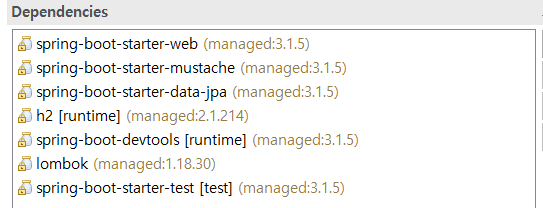
pom.xml
이번 프로젝트는 다음의 환경에서 테스트 되었다.
 |
 |
application.yml
file upload와 관련된 설정은 하단의 spring.servlet.multipart 관련 부분이다. 내용은 주석을 참고한다.
server:
    port: 9090
    servlet:
        encoding:
            force-response: true
spring:
    datasource:
        driver-class-name: org.h2.Driver
        password: ''
        url: jdbc:h2:~/spring-test
        username: sa
    h2:
        console:
            enabled: true
            path: /h2-console
    jpa:
        database-platform: org.hibernate.dialect.H2Dialect
        hibernate:
            ddl-auto: validate
        properties:
            hibernate:
                format_sql: true
        show-sql: true
    mustache:
        suffix: .html
    servlet:
        multipart:
            location: c:/Temp/                        # file upload 되는 경로
            max-file-size: 10MB                       # 단일 파일의 최대 크기
            max-request-size: 50MB                    # 하나의 요청에 포함된 전체 크기
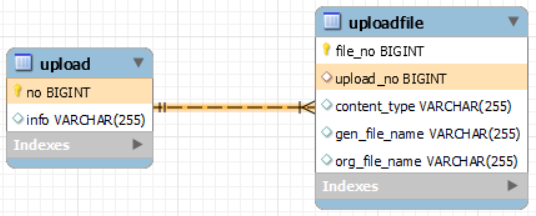
테이블 구조
한번의 요청에 여러 개의 파일을 등록할 수 있는 구조로 작성할 계획이므로 upload에는 main 정보, uploadfile에는 detail 정보를 저장하자.
클라이언트 작성

화면 구성
form의 submit 과 ajax를 이용해서 처리해보자. form을 만들 때 중요한 점은 enctype="multipart/form-data" 속성을 추가해줘야 한다. 또한 파일 전송은 method가 post만 가능하다. 추가로 업로드된 파일이 image 계열이라면 "업로드 결과"의 <img>태그에서 보여주는데 경로명이 uploads로 되어있음에 기억해두자.
코드는 mustache 기반으로 작성되었으므로 사용하는 template engine에 따라 작성해주자.
<!DOCTYPE html>
<html>
<head>
	<meta charset="UTF-8">
	<title>Insert title here</title>
	<style>
		.upload-images {			display: flex;		}
		.upload-images > div{
			border-right: 1px solid blueviolet;
			padding: 0 10px;
		}
		.upload-images img{			width: 100px;		}
	</style>
</head>

<body>
	<h1>file upload home 한글</h1>
	<hr>
	<form method="post" action="/upload" enctype="multipart/form-data">
		<input type="file" name="files" id="files" multiple>
		<input type="text" name="info" id="info" placeholder="파일 정보"><br>
		<input type="submit" value="form 업로드">
		<input type="button" value="ajax 업로드" id="ajax">
	</form>

	<hr>
	<h1>업로드 결과</h1>
	<div id="ajaxresult" class="upload-images">
		{{#uploads}}
		<div>
			<a href="/download?filename={{genFileName}}">{{orgFileName}}</a><br>
			{{#img}}
			<img src="/uploads/{{genFileName}}">
			{{/img}}
		</div>
		{{/uploads}}
	</div>
</body>
</html>
Ajax 활용
만약 ajax를 이용한다면 fetch 처리해볼 수도 있다. ajax로 upload를 처리할 때는 FormData 객체를 이용해야 한다. 서버에서 FormData를 이용한 전송을 처리하기 위해서는 @RequestParam (또는 @ModelAttribute)를 사용해야 한다.
<script>
	document.querySelector("#ajax").addEventListener("click", async function () {
		let formData = new FormData();
		let files = document.querySelector("#files").files;
		for (let i = 0; i < files.length; i++) {
			formData.append("files", files[i]);
		}
		formData.append("info", document.querySelector("#info").value);

		let response = await fetch("/uploadajax", {
			method: "post",
			body: formData
		});

		let json = await response.json();
		ajaxresult.innerHTML = "";
		json.forEach(info => {
			let html = `<div><a href="/download?filename=${info.genFileName}">${info.orgFileName}</a><br>`;
			if (info.img) {
				html+= `<img src="/uploads/${info.genFileName}">`;
			}
			html+="</div>"
			ajaxresult.innerHTML += html;
		})
	})
</script>
서버 처리
결과 확인을 위한 경로 설정
업로드된 파일의 확인을 위해 uploads 경로로 요청했던 내용을 기억할 것이다. 이를 위해 WebMvcConfigurer에 addResourceHandlers를 재정의해서 요청 경로와 물리적인 파일 경로를 매핑해주자.
@SpringBootApplication
public class FileuploadDownloadApplication implements WebMvcConfigurer{
    @Value("${spring.servlet.multipart.location}")
    String filePath;

	public static void main(String[] args) {
		SpringApplication.run(FileuploadDownloadApplication.class, args);
	}

	@Override
	public void addResourceHandlers(ResourceHandlerRegistry registry) {
	    // addResourceLocations 등록 시 어떤 방식으로 접근하는지(file or classpath) 설정
	    registry.addResourceHandler("/uploads/**").addResourceLocations("file:"+filePath);
	}
}
DTO 및 Entity 작성
main 정보를 관리하는 UploadDto이다. UploadDto는 여러 개의 MultiPartFile 타입 정보를 가지므로 List형태로 files를 갖는다.
package com.quietjun.example.dto;

import java.util.List;

import org.springframework.web.multipart.MultipartFile;

import lombok.AllArgsConstructor;
import lombok.Builder;
import lombok.Data;
import lombok.NoArgsConstructor;

@Data
@AllArgsConstructor
@NoArgsConstructor
@Builder
public class UploadDto {
    private String info;
    List<MultipartFile> files;
}
package com.quietjun.example.entity;
@Entity
@Table(name = "upload")
@Data
@AllArgsConstructor
@NoArgsConstructor
@Builder
public class UploadEntity {
@Id
@GeneratedValue(strategy = GenerationType.IDENTITY)
private long no;
private String info;
@OneToMany(mappedBy = "upload", cascade = CascadeType.ALL, fetch = FetchType.LAZY)
@Builder.Default
private List<FileEntity> files = new ArrayList<>();
public UploadEntity dtoToEntity(UploadDto dto, List<FileDto> fDtos) {
this.info = dto.getInfo();
for(FileDto fileDto : fDtos) {
FileEntity fileEntity = new FileEntity().dtoToEntity(fileDto);
fileEntity.setUploadEntity(this);
}
return this;
}
}
다음은 개별 파일의 정보를 저장할 FileDto이다. 파일이 서버에 등록될 때 클라이언트가 전송한 파일의 이름을 그대로 사용하면 이름 충돌이 발생할 수 있다. 따라서 전송된 이름(orgFileName)과 별도로 유일한 파일 이름(genFileName)을 만들어서 사용해야 한다.
package com.quietjun.example.dto;

import lombok.AllArgsConstructor;
import lombok.Builder;
import lombok.Data;
import lombok.NoArgsConstructor;

@Data
@AllArgsConstructor
@NoArgsConstructor
@Builder
public class FileDto {
    private String orgFileName; // 원래 파일 이름
    private String genFileName; // 생성된 unique 한 파일 이름
    private String contentType; // 파일의 content-type

    public boolean isImg() {    // 파일이 image 계열인지 확인
        return contentType.startsWith("image/");
    }
}
package com.quietjun.example.entity;
@Entity
@Table(name = "uploadfile")
@Data
@AllArgsConstructor
@NoArgsConstructor
@Builder
public class FileEntity {
@Id
@GeneratedValue(strategy = GenerationType.IDENTITY)
private Long fileNo;
private String genFileName;
private String orgFileName;
private String contentType;
@ManyToOne(fetch = FetchType.LAZY)
@JoinColumn
private UploadEntity upload;
public void setUploadEntity(UploadEntity upload) {
if (this.upload != null) {
this.upload.getFiles().remove(this);
}
this.upload = upload;
if(this.upload!=null) {
this.upload.getFiles().add(this);
}
}
public FileEntity dtoToEntity(FileDto dto) {
this.genFileName = dto.getGenFileName();
this.orgFileName = dto.getOrgFileName();
this.contentType = dto.getContentType();
return this;
}
}
Controller 처리
다음은 upload를 처리할 Controller를 작성해보자.
@Controller
@RequiredArgsConstructor
@Slf4j
public class FileController {

    @Value("${spring.servlet.multipart.location}")
    String filePath;

    private final UploadService uploadService;

    @GetMapping("/")
    public String index() {
        return "index";
    }

    @PostMapping("/upload")
    public String upload(@ModelAttribute UploadDto dto, Model model) {
        log.debug("업로드 정보: {}, {}", dto, dto.getFiles());

        List<FileDto> list = uploadService.save(dto); // 파일 저장 및 DB에 반영하기
        model.addAttribute("uploads", list);
        return "index";
    }

    @PostMapping("/uploadajax")
    @ResponseBody
    public List<FileDto> uploadajax(@ModelAttribute UploadDto dto, Model model) {
        log.debug("업로드 정보: {}", dto);
        List<FileDto> uploads = uploadService.save(dto); // 파일 저장 및 DB에 반영하기
        model.addAttribute("uploads", uploads);
        return uploads;
    }

    @GetMapping("/download")
    @ResponseBody
    public ResponseEntity<Object> download(@RequestParam String filename) throws IOException {
        log.debug("다운로드 정보: {}", filename);
        Map<String, Object> config = uploadService.download(filename);

        HttpHeaders headers = new HttpHeaders();
        headers.add(HttpHeaders.CONTENT_TYPE, config.get("contentType").toString());
        headers.setContentDisposition(ContentDisposition.builder("attachment")
                .filename(config.get("realName").toString(), StandardCharsets.UTF_8)
                .build());
        //headers.setCacheControl("no-cache, no-store, must-revalidate");
        return new ResponseEntity<Object>(config.get("resource"), headers, HttpStatus.OK);
    }
}
Service 작성
다음은 요청을 처리할 service이다.
saveFile 메서드는 파일을 파일 서버에 저장하는 역할을 수행하는데 이름 충돌을 대비하여 unique 한 이름을 생성하기 위해 UUID_fileName의 형태를 취하고 있다.
package com.quietjun.example.service;

@Service
@RequiredArgsConstructor
@Slf4j
public class UploadService {

    @Value("${spring.servlet.multipart.location}")
    String filePath;

    private final UploadRepo repo;

    @Transactional
    public List<FileDto> save(UploadDto dto) {
        List<FileDto> fileDtos = saveFile(dto);                   // file server에 파일 저장
        repo.save(new UploadEntity().dtoToEntity(dto, fileDtos)); // database에 파일 정보 저장
        return fileDtos;
    }

    private List<FileDto> saveFile(UploadDto dto) {
        List<MultipartFile> files = dto.getFiles();
        List<FileDto> uploads = new ArrayList<>();  // 화면에 업로드된 파일의 정보를 담기 위한 List
        if (files != null) {
            files.forEach(file -> {
                FileDto fDto = FileDto.builder().orgFileName(file.getOriginalFilename())
                                                .contentType(file.getContentType()).build();
                // unique한 이름 만들어주기
                fDto.setGenFileName(UUID.randomUUID() + "_" + fDto.getOrgFileName());
                try {
                    File localFile = new File(filePath, fDto.getGenFileName());
                    // 원격지의 file을 서버의 localFile에 출력
                    file.transferTo(localFile);
                    uploads.add(fDto);
                    log.debug("파일 저장 완료: {}", localFile.getCanonicalPath());
                } catch (IllegalStateException | IOException e) {
                    throw new RuntimeException(e);
                }
            });
        }
        return uploads;
    }

    public Map<String, Object> download(String filename) throws IOException {
        // 실제 물리 파일 정보 확인
        Path unique = Paths.get(filePath + filename);
        String contentType = Files.probeContentType(unique);
        // 화면에 보여줄 파일 이름 생성
        String realName = filename.substring(filename.indexOf("_") + 1);
        // 파일에 연결할 stream 구성
        Resource resource = new InputStreamResource(Files.newInputStream(unique));

        return Map.of("contentType", contentType, "realName", realName, "resource", resource);
    }
}
repository 작성
repository에는 별로 볼게 없다. 그냥 기본의 JpaRepository를 사용하자.
package com.quietjun.example.repo;

import org.springframework.data.jpa.repository.JpaRepository;

import com.quietjun.example.entity.UploadEntity;

public interface UploadRepo extends JpaRepository<UploadEntity, Long> {

}
'Spring MVC > 02.Spring @MVC' 카테고리의 다른 글
| [Spring@MVC] 스프링과 Filter (1) | 2022.11.18 |
|---|---|
| [spring]filter vs interceptor vs AOP (0) | 2021.10.21 |
| 08. Redirection과 flash scope (0) | 2020.07.09 |
| 07. 파라미터와 validation (0) | 2020.07.08 |
| 06. 파라미터의 formatting (0) | 2020.07.07 |
Contents
소중한 공감 감사합니다