06. 파라미터의 formatting
- -
파라미터의 formatting
화면에서 전달된 파라미터가 HTTP 를 통해 서버로 전송될 때는 언제나 문자열이다. 이제까지 똑똑한 @Controller는 적절한 자바 데이터 타입으로 형 변환 후 전달해줬다.
    @RequestMapping("/add")
    public String add(@RequestParam Double a, @RequestParam Integer b, Model model) {
        String message = String.format("%3.1f와 %d의 합은 %3.1f입니다.", a, b, a + b);
        model.addAttribute("message", message);
        return "index";
    }
하지만 Controller는 인공지능이 아니니 조금만 복잡해지면 값에 대한 binding 처리가 불가능하다. 따라서 클라이언트 화면과 서버 양 단 간에 문자열 데이터의 표시 및 형 변환을 위한 장치가 필요한데 통상 formatter 라고 부른다.
일반적으로 formatter는 날짜, 숫자 타입과 문자열 간의 형 변환 룰을 규정한다. 예를 들어 java.util.Date 타입의 객체를 2020-01-01(수) 형태로 화면에 보여준다던가 반대로 2020-02-02(수)형태의 문자열을 java.util.Date 형태로 변경할 필요가 있다.

formatter의 적용
직원 정보를 수정처리하는 화면을 통해 formatter의 필요성에 대해 알아보자.
DTO 작성
먼저 직원 정보인 Employee와 직원 번호를 나타내는 EmpNo를 추가한다. Employee의 birth와 balance, empNo가 formatter에서 신경쓸 부분이다.
package com.eshome.mvc.model.dto;

import lombok.AllArgsConstructor;
import lombok.Data;
import lombok.NoArgsConstructor;

@Data
@AllArgsConstructor
@NoArgsConstructor
public class EmpNo {
    private String empNo;
}
package com.eshome.mvc.model.dto;

import java.time.LocalDate;
import lombok.AllArgsConstructor;
import lombok.Data;
import lombok.NoArgsConstructor;

@Data
@AllArgsConstructor
@NoArgsConstructor
public class Employee {
    private String id;
    private String name;
    private String password;
    private String cPassword;
    private String email;
    private LocalDate birth;
    private Double balance;

    private EmpNo empNo;
}
Service 작성
다음은 Service 부분이다. Repo 부분은 생략하고 단순히 emp를 조회하거나 설정하도록만 구현한다.
public interface EmpService {
    public void setEmp(Employee emp);

    public Employee getEmp();
}


public class EmpServiceImpl implements EmpService {

    Employee emp = new Employee("hong", "홍길동", "1234", "1234", "abc@def.net",
            LocalDate.now(), 123456789.123, new EmpNo("1234567890"));

    @Override
    public void setEmp(Employee emp) {
        this.emp = emp;
    }

    @Override
    public Employee getEmp() {
        return emp;
    }
}
form을 보여주는 handler method 작성
UserContnroller를 작성하고 기존 직원 정보를 보여주는 handler method를 작성해보자.
@Controller
@Slf4j
public class UserController {
    // 모델 연동 처리
    @Autowired
    EmpService service;

    @GetMapping("/mod")
    public String modForm(Model model, @RequestParam String id) {
        // id에 해당하는 객체를 서비스를 통해서 조회
        Employee dummy = service.getEmp();
        model.addAttribute("emp", dummy);
        return "modEmp";
    }
}
사용자 요청에 파라미터로 전달된 id를 기반으로 Service에서 사용자 정보를 조회 후 반환하는것이 좋겠지만 간단히 dummy로 Employee 객체를 만들어서 model에 emp라는 이름으로 추가한 후 modEmp를 반환한다.
view 작성
modEmp.html에서는 Model을 통해 저장해 둔 emp를 화면에 뿌려준다. <input>요소를 DTO와 연결할 때는 th:field를 사용한다. th:field를 사용하면 자동으로 DTO의 field와 동일한 이름으로 id, name 속성을 만들고 value를 연결한다.
<!-- 소스 코드 -->
<input type="text" th:field="*{id}">

<!-- 실제 생성된 DOM -->
<input type="text" id="id" name="name" value="hong" >
th:object="${emp}"와 같이 form 내부에서 사용할 객체를 선언하고 실제 값을 참조할 때에는 th:value="*{password}"와 같이 소속 정보를 생략하고 사용한다.
<!DOCTYPE html>
<html xmlns:th="http://www.thymeleaf.org">
<head>
<meta charset="UTF-8">
<title>Insert title here</title>
<style>
	#modEmp>label{
		display: inline-block;
		width: 100px;
	}
</style>
</head>
<body>
	<form th:object="${emp}" method="post" th:action="@{/mod}" id="modEmp">
	<h1>직원 정보 수정</h1>
		<label for="id">아이디</label>
		<input type="text" th:field="*{id}">
		<br>
		<label for="name">이름</label>
		<input type="text" th:field="*{name}">
		<br>
		<label for="password">비밀번호</label>
		<input type="password" th:field="*{password}">
		<br>
		<label for="cPassword">비번확인</label>
		<input type="password" th:field="*{cPassword}">
		<br>
		<label for="email">이메일</label>
		<input type="text" th:field="*{email}">
		<br>
		<label for="birth">생일</label>
		<input type="text" th:field="*{birth}">
		<br>
		<label for="balance">은행잔고</label>
		<input type="text" th:field="*{balance}">
		<br>
		<label for="empNo">사번</label>
		<input type="text" th:field="*{empNo}">
		<br>
		<input type="submit">
	</form>
</body>
</html>
수정 후 결과를 보여줄 화면도 만들어보자.
<!DOCTYPE html>
<html xmlns:th="http://www.thymeleaf.org">
<head>
<meta charset="UTF-8">
<title>Insert title here</title>
</head>
<body>
  <h1>수정 결과</h1>
  <ul th:object="${emp}">
    <li th:text="|아이디: *{id}|">아이디
    <li th:text="|이름: *{name}|">이름
    <li th:text="|비밀번호: *{password}|">비밀번호
    <li th:text="|이메일: *{email}|">이메일
    <li th:text="|생일: *{birth}|">생일
    <li th:text="|은행잔고: *{balance}|">은행잔고
    <li th:text="|사번: *{empNo}|">사번
  </ul>
</body>
</html>
그래서 문제는?
이제 /mod를 요청해보자.

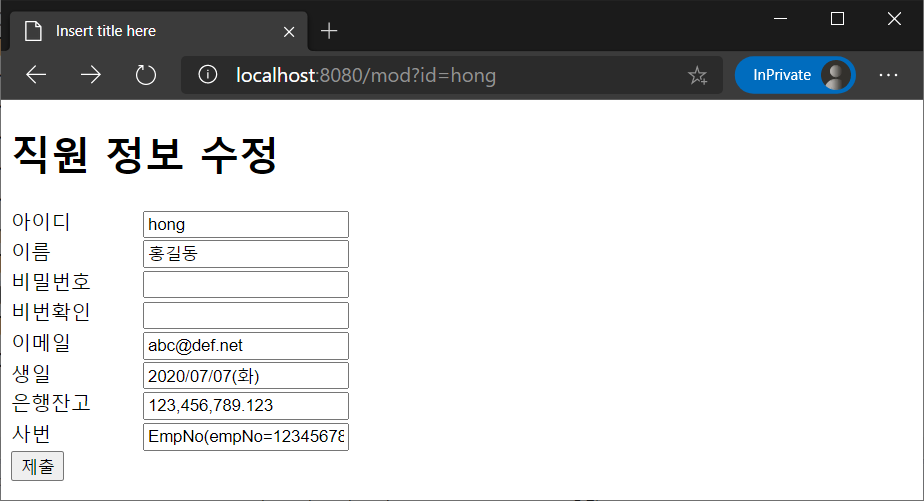
문제는? 생일이나 은행잔고를 읽기가 쉽지 않다. 생일에 요일이 표시되었으면 좋겠고 잔고는 통화 기호와 함께 일반 숫자로 표시하고 싶다. 사번은 단지 EmpNo의 toString 결과가 출력되고 있다.
물론 이런 것들을 자바스크립트로 처리하려고 한다면 말리지는 않는다.
formatter 적용 방법
formatter를 적용하는 방법은 크게 3가지로 나눌 수 있다.
-
template의 format 관련 기능
-
Thymeleaf는 물론 JSP 등 대부분 template engine들은 format과 관련된 기능을 가지고 있다. JSP에서는 JSTL을 이용해서 format을 설정하고 Thymeleaf는 #dates, #numbers 등 유틸리티 객체를 이용한다.
-
하지만 이 방법을 사용하면 Template engine이 교체될 때 관련 내용을 매번 설정해야 하는 번거로움이 있기 때문에 확장성에서 좋지 않다.
-
또한 단방향으로만 적용되었기 때문에 서버에서 변경된 문자열을 받은 후 다시 바인딩 처리할 때 별도의 처리가 필요하다.
-
<!-- thymeleaf의 예 -->
${#dates.format(date)}
${#dates.format(date, 'dd/MMM/yyyy HH:mm')}

${#temporals.format(date)}

${#numbers.formatInteger(num,3,'COMMA')}
-
DTO 또는 Controller의 handler method에 적용
-
스프링이 제공하는 @DateTimeFormat이나 @NumberFormat을 DTO의 field 또는 handler method의 파라미터에 선언할 수 있다.
-
이 경우 한번 적용해 놓으면 모든 곳에서 동일하게 적용할 수 있는 장점이 있다.
-
@DateTimeFormat(iso=ISO.DATE)
private Date birth;
-
사용자 정의 formatter 설정
-
사번이나 은행 계좌 번호 등 사용자 정의로 형식을 정해야 하는 경우가 발생한다.
-
스프링에서는 사용자 정의 Formatter를 만들고 WebMvcConfigurer의 addFormatters로 등록할 수 있다.
-
DTO에 formatter 설정
문자열 데이터를 원하는 형태로 처리하는 가장 손쉬운 방법은 @DateTimeFormat이나 @NumberFormat 같은 애너테이션을 이용하는 것이다.
@Retention(RetentionPolicy.RUNTIME)
@Target({ElementType.METHOD, ElementType.FIELD, ElementType.PARAMETER, ElementType.ANNOTATION_TYPE})
public @interface DateTimeFormat {
  ISO iso() default ISO.NONE;
  String pattern() default "";
  enum ISO {
    DATE,//"2000-10-31"
    TIME,//"01:30:00.000-05:00"
    DATE_TIME,//"2000-10-31 01:30:00.000-05:00", default
    NONE
  }
}
@DateTimeFormat은 메서드나 DTO의 field, handler method의 Parameter 등에 선언하는 애너테이션이다. 정해진 포멧을 사용하려는 경우 iso 속성을 이용하고 출력 형태를 커스터머이징 하기 위해서는 pattern 속성을 이용한다.
@Retention(RetentionPolicy.RUNTIME)
@Target({ElementType.METHOD, ElementType.FIELD, ElementType.PARAMETER, ElementType.ANNOTATION_TYPE})
public @interface NumberFormat {
  Style style() default Style.DEFAULT;
  String pattern() default "";
  enum Style {
    NUMBER, // 가장 일반적인 형태로 천단위 구분자 사용
    CURRENCY, // 통화 기호 표시
    PERCENT // % 표시
  }
}
@NumberFormat 역시 메서드, DTO의 field, handler method의 parameter등에 선언하는 애너테이션으로 지정된 포멧을 사용하려는 경우 style 속성을, 사용자 지정 속성을 사용하려는 경우는 pattern을 사용한다.
다음은 Employee DTO에 formatter를 설정한 예이다.
@Data
@AllArgsConstructor
@NoArgsConstructor
public class Employee {
    private String id;
    private String name;
    private String password;
    private String cPassword;
    private String email;
    @DateTimeFormat(pattern = "yyyy/MM/dd(E)")
    private LocalDate birth;
    @NumberFormat(style = Style.NUMBER)
    private Double balance;
    private EmpNo empNo;
}
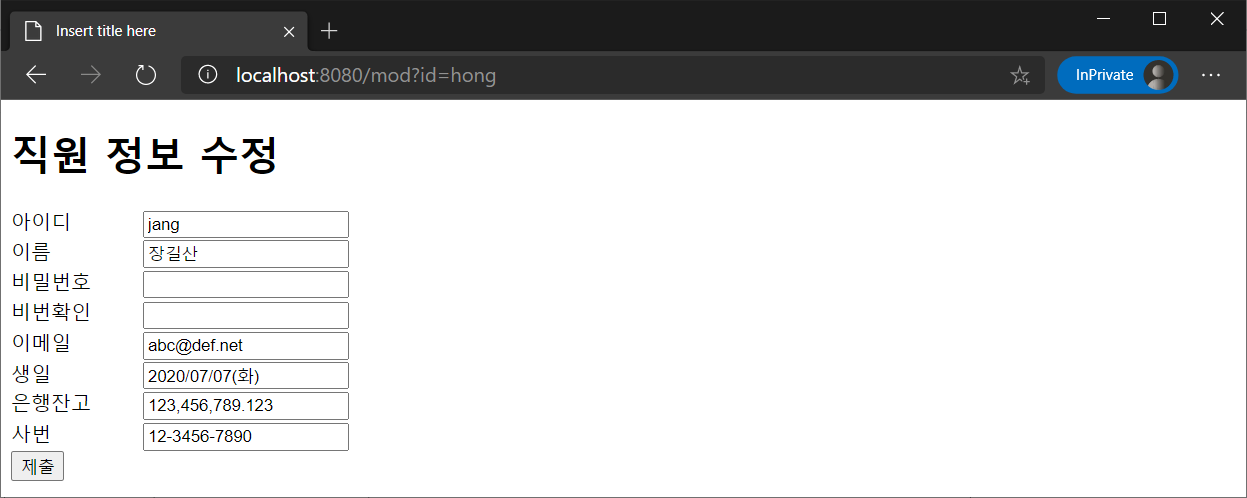
다시 페이지를 요청해보면 우리가 원하는 형태로 출력됨을 알 수 있다.

하지만 마지막의 사번은 아쉽다. 사번은 12-345-67890 형태로 보여주고 싶지만 미리 정해진 formatter에 그런 내용이 있을 리 없다.
사용자 정의 포메터
대부분 포멧의 변경은 위에서 살펴본대로 숫자와 날짜인 경우가 많다. EmpNo와 같이 우리가 만든 클래스의 포멧은 직접 지정해줘야 한다. 이를 위해 Formatter interface를 이용해서 사용자 정의 formatter를 구성한다.
package com.eshome.mvc.formatter;

import java.util.Locale;
import org.springframework.expression.ParseException;
import org.springframework.format.Formatter;
import com.eshome.mvc.model.dto.EmpNo;

public class EmpNoFormatter implements Formatter<EmpNo> {
    // 객체에 할당된 값을 화면에 출력할 형태 결정
    public String print(EmpNo object, Locale locale) {
        String empNo = object.getEmpNo();
        return empNo.substring(0, 2) + "-" + empNo.substring(2, 6) + "-" + empNo.substring(6, 10);
    }

    // 화면의 문자열 값을 다시 객체에 할당할 방식 결정
    public EmpNo parse(String text, Locale locale) throws ParseException {
        text = text.replace("-", "");
        System.out.println(text);
        return new EmpNo(text);
    }
}
formatter를 적용하기 위해서는 WebMvcConfigurer에서 addFormatters를 재정의한다.
    @Override
    public void addFormatters(FormatterRegistry registry) {
        registry.addFormatter(new EmpNoFormatter());
    }
formatter를 적용하고 다시 한번 페이지를 요청해보면 원하는 형태의 출력을 확인할 수 있다.

서버에서의 처리
수정 화면에서 사용자가 값을 변경하고 서버로 다시 전송해보자.
간단하게 전달받은 파라미터를 @ModelAttribute를 통해 Employee 객체에 매핑시키고 model에 message로 저장한 후 index 페이지에서 확인한다. 여기서 주의할 점은 @ModelAttribute의 value 값을 화면의 객체 이름인 emp와 동일하게 설정해줘야 한다는 점이다.(지금은 괜찮지만 나중에 에러 메시지 처리에 중요하다.)
    @PostMapping("/mod")
    public String doModEmp(Model model, @ModelAttribute("emp") Employee emp) {
        model.addAttribute("message", emp);
        service.setEmp(emp);
        return "modSuccess";
    }

화면에서 넘겨준 값이 서버로 잘 전달되는 것을 확인할 수 있다.
오류 처리
바인딩 에러
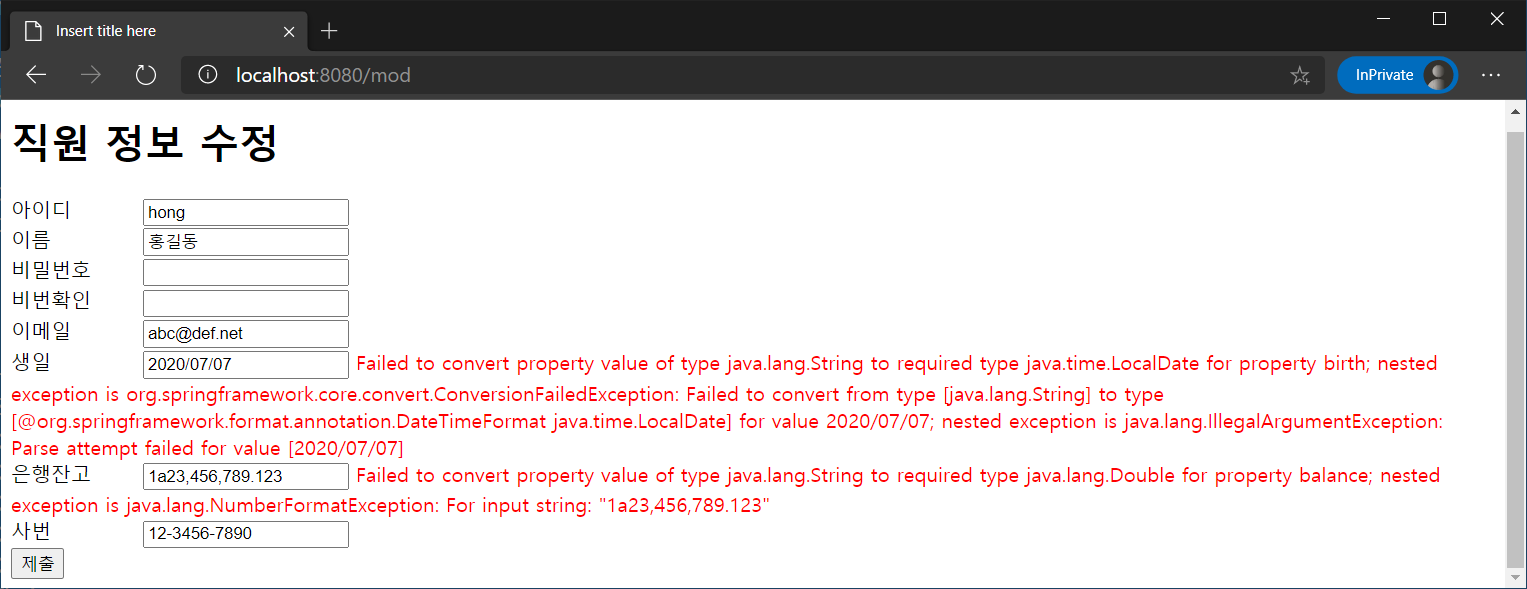
formatter를 지정했기 때문에 지정된 형태로 값이 전달 될 때만 형 변환이 가능하다. 만약 날짜가 yyyy/MM/dd(E)형태로 전달되지 않으면 어떻게 될까?

생일과 은행잔고 값을 살펴보면 형식이 망가진 것을 볼 수 있다.
이 상태로 서버로 전송해보면 yyyy/MM/dd(E)를 기다리는 서버는 당연히 처리가 불가하다.

2개의 오류가 있어서 400 오류가 발생한 것을 알 수 있다.
이런 오류는 Binding 오류라고하며 스프링에서는 다음 3종류의 binding error가 있다.
| 오류 명 | 설명 |
| typeMismatch | format 불일치에서 오는 형변환 오류 |
| required | 필수 컬럼 누락에서 오는 오류 |
| methodInvocation | getter/setter 누락에 따른 메서드 호출 오류 |
이런 오류가 발생하면 어떻게 처리하는 것이 좋을까?
서버측 오류 처리
오류가 발생하면 최선은 다시 화면을 사용자에게 보여주고 오류 내용을 바로잡도록 하는 것이다. 파라미터를 DTO로 바인딩하는 과정에서 발생하는 오류는 BindingResult라는 객체에 담겨서 handler method에 전달된다. 이제 이 BindingResult에 오류가 담겨있다면 다시 오류 화면을 보여주면 된다.
@PostMapping("/mod")
public String doModEmp(Model model, @ModelAttribute("emp") Employee emp, BindingResult result) {
    // 오류가 담겨있다면
    if (result.hasErrors()) {
        // 직원 정보 수정 페이지로 다시 이동한다.
        return "modEmp";
    }
    model.addAttribute("message", emp);
    service.setEmp(emp);
    return "modSuccess";
}
이때 주의할 점은 BindingResult는 반드시 @ModelAttribute의 뒤에 선언해야 한다.
다시 잘못된 요청을 날려보면 수정 페이지로 성공적으로 되돌아 온 것을 확인할 수 있다. (URL 부분을 살펴보자.)

이제 원하는 형태로 잘 출력됨을 알 수 있다. 하지만 어떤 오류인지 표시가 되지 않는다면 사용자는 대처할 수가 없다.
오류 화면 처리
thymeleaf에서 화면단으로 전달된 오류는 #fields와 th:errors를 통해 확인할 수 있다. #fields의 hasErrors는 field이름을 파라미터로 받으며 해당 field에 오류가 있는지 리턴한다. th:errors는 해당 field의 오류를 할당 받는다.
error 클래스에 대한 스타일 정의를 추가하고 birth, balance, empNo에 대한 오류 표시 필드를 설정해주자.
<!DOCTYPE html>
<html xmlns:th="http://www.thymeleaf.org">
<head>
<meta charset="UTF-8">
<title>Insert title here</title>
<style>
	#modEmp>label{
		display: inline-block;
		width: 100px;
	}
	.error{
		color: red;
	}
</style>
</head>
<body>
	<form th:object="${emp}" method="post" th:action="@{/mod}" id="modEmp">
	<h1>직원 정보 수정</h1>
		. . .
		<label for="birth">생일</label>
		<input type="text" th:field="*{birth}">
		<span class="error" th:if="${#fields.hasErrors('birth')}" th:errors="*{birth}"></span>
		<br>
		<label for="balance">은행잔고</label>
		<input type="text" th:field="*{balance}">
		<span class="error" th:if="${#fields.hasErrors('balance')}" th:errors="*{balance}"></span>
		<br>
		<label for="empNo">사번</label>
		<input type="text" th:field="*{empNo}">
		<span class="error" th:if="${#fields.hasErrors('empNo')}" th:errors="*{empNo}"></span>
		<br>
		<input type="submit">
	</form>
</body>
</html>
이제 우리의 바람대로 어떤 이유로 어떤 field에서 오류가 발생했는지를 보여줄 수 있게 되었다.

하지만 아무래도 이 상태로 클라이언트가 화면을 마주한다면 매우 당황할 것이다.
사용자 정의 메시지
이제 마지막 단계로 오류 메시지를 재정의해보자.
매지시 재정의
오류 메시지는 별도의 message인 .properties 파일에 작성한다. src/main/resources/messages/error.properties 파일을 생성하고 아래 내용을 작성한다.

required={0}은 필수 입력 항목입니다.
typeMismatch={0} 항목의 타입을 확인하세요.
methodInvocation={0} 항목을 설정할 수 없습니다.
항목의 키는 binding error의 이름들이고(당연히 오타가 있으면 안된다.) 값은 해당 오류시 화면에 보여줄 메시지이다. {0}는 오류 메시지에 전달되는 파라미터 이름인데 오류가 발생한 field 이름이 전달된다.
message base name 설정
위 메시지를 처리하는 녀석은 MessageSource라는 빈인데 스프링 부트는 자동으로 이 빈이 생성되기 때문에 message의 위치만 알려주면 된다.
이를 위해 application.propeerties에 spring.messages.basename에 message 파일의 이름을 설정한다.
spring.messages.basename=messages/error
드디어 원하는 형태의 메시지 출력이 완성 되었다.

에러 메시지의 세분화
위의 에러 메시지는 typeMismatch에 의해 어떤 항목의 값이 잘못되었다는 정보는 주지만 그래서 어떤 형식으로 작성해야한다는 힌트는 주지 못한다. 이를 위해 에러 메시지를 좀 더 세분화 할 필요가 있다.
에러 메시지는 다음의 순서로 찾아가며 먼저 발견된 에러 메시지가 적용된다.

에러 타입은 typeMismatch등 바인딩 에러의 종류를 의미하고 객체는 model에 등록된 이름이다. 우리 예제에서는 emp를 의미한다. field명은 DTO에서 field의 이름이다. 클래스는 field에 연결된 자바 클래스 이름으로 패키지를 포함해서 적는다.
이를 참조해서 좀 더 세분화된 에러 메시지를 작성해보자.
required={0}은 필수 입력 항목입니다.
methodInvocation={0} 항목을 설정할 수 없습니다.

#주어진 model이름(userInfo)의 field 이름(salary)에서 발생한 type mismatch에 적용
typeMismatch.emp.birth= 생일의 입력 값을 확인하세요.(예) 2020/01/01(수))

#필드 이름과 매치될 경우 발생하는 에러에 적용
typeMismatch.balance={0} 항목의 타입을 확인하세요.(예) 99,999.99)

#특정 클래스 타입에 매치되는 필드에서 발생하는 에러에 적용
typeMismatch.java.util.Date={0} 항목은 날짜 형태입니다. (예) 2000-01-01 (월)

#모든 타입 미스매치 에러에 적용
typeMismatch={0} 항목의 타입을 확인하세요.
이제 원하는 형태로 잘 커스터마이징이 완료되었다.

상당히 긴 과정을 통해 formatting에 대해 정리해봤는데 뒤에 다룰 validation도 동일한 형태로 이뤄지기 때문에 다음에는 좀 더 수월할것 같다.
'Spring MVC > 02.Spring @MVC' 카테고리의 다른 글
| 08. Redirection과 flash scope (0) | 2020.07.09 |
|---|---|
| 07. 파라미터와 validation (0) | 2020.07.08 |
| 05. Handler Interceptor (1) | 2020.07.03 |
| 04. 웹과 관련된 설정 (0) | 2020.07.02 |
| 03. Controller 작성 2 (2) | 2020.07.01 |
소중한 공감 감사합니다