MyBatis
[MyBatis] 02. CRUD
- -
이번 포스트에서는 MyBatis를 이용한 CRUD(Create, Read, Update, Delete)쿼리 처리를 통해 기본 사용법을 익혀보자.
MyBatis를 이용한 CRUD
기본적인 동작 방식의 결정
MyBatis도 오랜 기간 사용되면서 다양한 방식으로 사용되는데 크게 두 가지 방식으로 요약할 수 있다.
- repo interface -> repo interface impl -> mapper.xml: 가장 기본적인 형태
- repo interface -> mapper.xml: naming rule을 기반으로하는 축약 형태
기본적으로는 2의 방법을 사용할 계획이지만 너무 급작스럽게 생략된 형태를 사용하면 쉽지 않으므로 1의 방식을 먼저 연습하고 2로 넘어가도록 하자.
참고로 이 외에도 mapper xml 없이 그냥 repo interface에 애너테이션으로 작성하기도 한다.
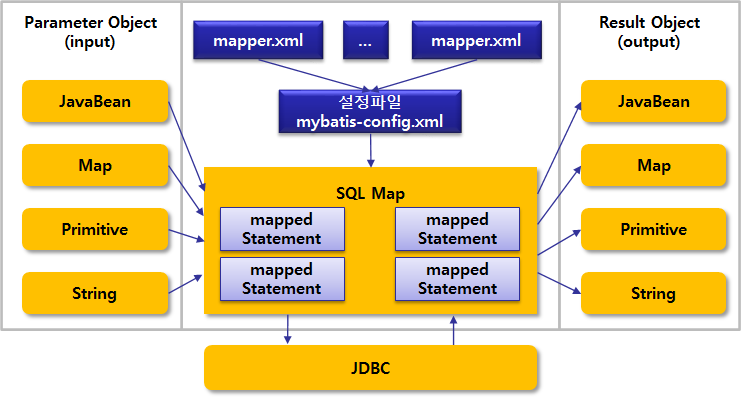
일단 다음의 그림을 다시 한번 기억해두자.
DTO 작성
사용할 테이블은 Country와 City 이다. 이 두 테이블의 데이터를 가지고 다닐 DTO 클래스를 작성해보자. DTO를 만들면서 신경써야 할 부분은 패키지 명이다. 앞서 설정을 만들면서 type-aliases-packae를 설정한 적이 있는데 그 패키지에 DTO를 작성해야 한다.
package com.doding.mybatis.model.dto;


import lombok.Data;
import lombok.NoArgsConstructor;
import lombok.NonNull;
import lombok.RequiredArgsConstructor;

@Data
@NoArgsConstructor
@RequiredArgsConstructor
public class Country {
    @NonNull
    private String code;
    @NonNull
    private String name;
    @NonNull
    private String continent;
    private String region = "";
    private Double surfaceArea = 0.0;
    private Integer indepYear;
    private Long population = 0L;
    private Double lifeExpectancy;
    private Double GNP;
    private Double GNPOld;
    private String localName = "";
    private String governmentForm = "";
    private String headOfState;
    private Integer capital;
    private String code2 = "";
}
package com.doding.mybatis.model.dto;

import lombok.AllArgsConstructor;
import lombok.Data;
import lombok.NoArgsConstructor;

@Data
@NoArgsConstructor
@AllArgsConstructor
public class City {
  private Integer id;
  private String name;
  private String countryCode;

  private String district;
  private Integer population;
}
Repo 클래스 생성
package com.doding.mybatis.model.repo;

import com.doding.mybatis.model.dto.Country;

public interface CountryRepo {
  public int insert(Country country);
}
package com.doding.mybatis.model.repo;
import org.mybatis.spring.SqlSessionTemplate;
import org.springframework.beans.factory.annotation.Autowired;
import org.springframework.stereotype.Repository;
import com.doding.mybatis.model.dto.Country;
@Repository
public class BasicCountryRepo implements CountryRepo{
@Override
public int insert(Country country) {
return null;
}
}
mapper.xml
mapper.xml 파일의 작성
mapper는 xml 형태로 sql 문장을 작성하는 파일로 일반적으로 테이블 당 하나의 mapper가 작성된다. mapper 파일의 위치는 mapper-locations에 설정한 경로(classpath:/db/mapper/*.xml)로 한다. 따라서 src/main/resources/db/mapper 경로 아래에 xml 파일로 작성한다. 파일의 형식은 https://mybatis.org/mybatis-3/ko/getting-started.html에서 확인할 수 있다.
<?xml version="1.0" encoding="UTF-8"?>
<!DOCTYPE mapper PUBLIC "-//mybatis.org//DTD Mapper 3.0//EN" "http://mybatis.org/dtd/mybatis-3-mapper.dtd">

<mapper namespace="com.doding.mybatis.model.repo.CountryRepo">
  <insert id="insert" parameterType="Country">
    insert into country
    <!-- 테이블에 있는 컬럼 이름들 -->
    (Code,Name,Continent,Region,SurfaceArea,IndepYear,Population,LifeExpectancy,
                  GNP,GNPOld,LocalName,GovernmentForm,HeadOfState,Capital,Code2)
    <!-- value의 값들은 파라미터인 Country의 속성 명 -->
    values(#{code},#{name},#{continent},#{region},#{surfaceArea},#{indepYear},#{population},#{lifeExpectancy}
    ,#{GNP}, #{GNPOld},#{localName},#{governmentForm},#{headOfState},#{capital},#{code2}
    )
  </insert>
</mapper>
mapper.xml 파일의 구성
xml 파일의 내용에 대해 알아보자.
- <mapper>
- mapper xml의 root element이므로 반드시 하나 존재한다.
- namespace: 각각의 mapper들을 구별하기 위한 이름으로 Repository의 구현체에서 사용된다.
- <insert>
- 처리하려는 작업의 성격에 따라 <insert>, <update>, <delete>, <select> 가 존재한다.
- id: mapper 내에서 고유한 값으로 namespace + '.' + id가 mapped statement의 이름이 된다.
- parameterType: sql 문장에서 사용하기 위한 값으로 태그에 전달될 파라미터의 타입이다.
파라미터 타입
MyBatis는 Java에서 사용하는 모든 데이터 형을 파라미터로 처리할 수 있으며 이에 대한 별칭을 함께 제공한다.
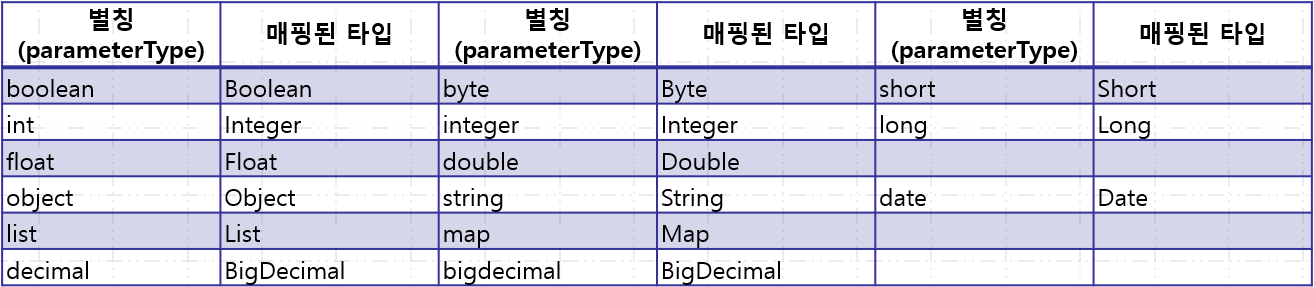
이 외에 사용자 정의 클래스(JavaBeans 형태의 DTO)가 많이 사용된다. DTO를 사용할 때는 패키지 이름을 포함한 fully qualified name을 사용하는데 application.properties에서 type-aliases-package를 지정했기 때문에 간략히 클래스 이름(또는 camel case)만 사용해도 된다.
파라미터 타입은 statement 호출과 연결되는 interface method에 의해 추정되므로 생략 가능하다.
SQL 내부에서의 파라미터 표기법
MyBatis에서 SQL을 작성하면서 전달된 파라미터를 사용할 때 #{parameter_name} 표현식을 사용한다. 이 표현식의 사용은 결과적으로 PreparedStatement에서 ? 를 이용해서 파라미터를 처리하는것과 같다.
#{param_name} 내부에 들어가는 키워드는 parameterType에 따라 다르다.
- parameterType이 기본형, String 처럼 하나일 경우 parameter_name에는 #{아무런 값이나 사용} 가능하다.
- parameterType이 JavaBeans라면 #{JavaBeans의 속성명}형태를 사용한다.
- parameterType이 Map 계열이면 #{Map의 key}을 사용한다.
RepoImpl 클래스에서의 활용
Repository 구현체의 작성
이제 @Repository와 mapper.xml을 연동해서 사용해보자.
package com.doding.mybatis.model.repo;

import org.mybatis.spring.SqlSessionTemplate;
import org.springframework.beans.factory.annotation.Autowired;
import org.springframework.stereotype.Repository;

import com.doding.mybatis.model.dto.Country;

@Repository
public class BasicCountryRepo implements CountryRepo{
	//mapper.xml에 선언한 namespace + .
	private static final String ns = "com.doding.mybatis.model.repo.CountryRepo.";

	@Autowired
	//mapper의 sql을 실행하기 위한 객
	SqlSessionTemplate template;

	@Override
	public int insert(Country country) {
		// ns + mapper.xml의 태그 id로 mapped statement 호
		return template.insert(ns+"insert", country);
	}
}
- String ns: mapper.xml의 namespace 속성에 '.'을 붙여서 만든다. mapped statement를 호출할 때 사용된다.
- SqlSessionTemplate: MyBatis의 SqlSession에 대한 빈으로 mapped statement를 호출하는 메서드들을 가진다.
- SQL 성격에 따라 insert, update, delete, selectOne, selectList등 메서드를 사용할 수 있다.
- template의 메서드를 호출할 때는 String statement를 넘겨주는데 이것을 이용해서 mapper.xml의 태그를 연결한다.
- statement의 형태는 namespace + '.' + tag id로 구성된다.
단위테스트를 통한 동작 확인
단위테스트 작성
단위테스트를 통해 위 메서드가 잘 동작하는지 확인해보자. Country 객체를 저장해보고 저장된 개수인 1이 반환되면 성공이다.
@Autowired
CountryRepo cRepo;

@Test
public void insertTest() {
  Country country = new Country("ATL", "Atlantis", "Africa");
  int result = cRepo.insert(country);
  Assertions.assertEquals(result, 1);
}
참고로 Country 테이블의 인코딩은 라틴으로 한글 데이터를 넣을 수 없다.
실행 결과 데이터가 잘 등록된 것을 확인할 수 있다.
08:17:03 [ INFO] [c.z.h.HikariDataSource.getConnection-123] > HikariPool-1 - Start completed.
08:17:03 [DEBUG] [c.e.d.m.r.C.insert.debug-137] > ==>  Preparing: insert into country
  (Code,Name,Continent,Region,SurfaceArea,IndepYear,Population,LifeExpectancy, GNP,GNPOld,
    LocalName,GovernmentForm,HeadOfState,Capital,Code2)
  values(?,?,?,?,?,?,?,? ,?, ?,?,?,?,?,? )
08:17:03 [DEBUG] [c.e.d.m.r.C.insert.debug-137] > ==> Parameters: ATL(String), Atlantis(String),
  Africa(String), (String), 0.0(Double), null, 0(Long), null, null, null,
  (String), (String), null, null, (String)
08:17:03 [DEBUG] [c.e.d.m.r.C.insert.debug-137] > <==    Updates: 1
08:17:03 [ INFO] [c.z.h.HikariDataSource.close-350] > HikariPool-1 - Shutdown initiated...
실행 결과 출력된 로그를 살펴보면 PreparedStatement 형태의 쿼리가 준비되고 넘겨준 파라미터가 잘 설정되는 것을 확인할 수 있다. 최종 실행 결과는 1개의 행이 업데이트 되었다.
@Transactional
위 에서 실행했던 단위테스트를 다시한번 실행하면 어떻게 될까?
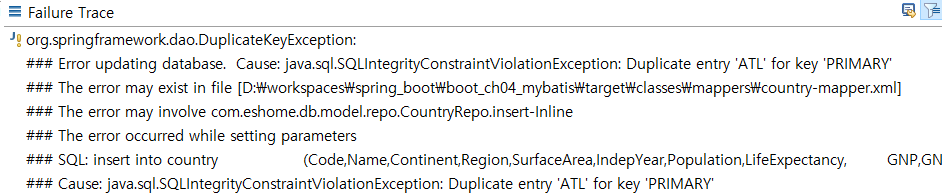
Country 테이블의 Code 컬럼은 Primary key인데 'ATL' 이 존재하는 상황에서 또다시 동일한 Code가 들어오기 때문에 DuplicateKeyException이 발생하는 너무도 당영한 상황이다. 그럼 단위테스트를 실행할 때마다 매번 새로운 값을 넣어줘야한다는 이야기일까?
그런데 우리가 집중할 것은 이번 단위테스트를 통해 데이터가 들어가는지 확인해보는게 목적이었지 데이터를 저장할 계획은 없었다. 즉 유지할 필요는 없는 것이다.
이때 @Transactional 애너테이션을 테스트 메서드에 사용해보자. 단위테스트에 선언된 @Transactional은 트랜젝션을 rollback 시켜버린다.
@Transactional
public void insertTest() {
    Country country = new Country("ATL", "Atlantis", "Africa");
    int result = cRepo.insert(country);
    assertEquals(result, 1);
}
기존에 저장된 데이터를 지운 후 다시 단위테스트를 실행해보자.
delete from country where code='atl';
commit;
select * from country where code='atl';
출력된 로그를 살펴보면 아까와는 달리 Transaction과 관련된 내용이 추가되며 insert 작업이 끝나고 rollback 시켜버리는 것을 확인할 수 있다.
08:28:16 [ INFO] [c.z.h.HikariDataSource.getConnection-123] > HikariPool-1 - Start completed.
08:28:16 [ INFO] [o.s.t.c.t.TransactionContext.startTransaction-107] > Began transaction (1) ~~~
08:28:16 [DEBUG] [c.e.d.m.r.C.insert.debug-137] > ==>  Preparing: insert into country (Code,Name,Continent,Region,SurfaceArea,IndepYear,Population,LifeExpectancy, GNP,GNPOld,LocalName,GovernmentForm,HeadOfState,Capital,Code2)
                                                       values(?,?,?,?,?,?,?,? ,?, ?,?,?,?,?,? )
08:28:16 [DEBUG] [c.e.d.m.r.C.insert.debug-137] > ==> Parameters: ATL(String), Atlantis(String), Africa(String), (String), 0.0(Double), null, 0(Long), null, null, null, (String), (String), null, null, (String)
08:28:16 [DEBUG] [c.e.d.m.r.C.insert.debug-137] > <==    Updates: 1
08:28:16 [ INFO] [o.s.t.c.t.TransactionContext.endTransaction-139] > Rolled back transaction ~~~
08:28:16 [ INFO] [c.z.h.HikariDataSource.close-350] > HikariPool-1 - Shutdown initiated...
이제 아무리 단위테스트를 반복한다고 하더라도 Database의 상태를 변경시키지 않고 우리의 목적을 달성할 수 있게 되었다.
RepoImpl의 생략
naming rules
하나만 만들어보았지만 CountryRepoImpl은 단순히 자바 메서드와 mapper.xml의 태그를 연결하는 역할만을 수행한다.
이에 MyBatis는 CountryRepo(앞으로 mapper interface 라고 부른다.)와 mapper.xml에서 몇 가지 조건만 일치시켜 준다면 구지 CountryRepoImpl 같은 구현체를 만들지 않아도 상관없게 만들어준다.
- mapper interface의 package + class 이름은 mapper.xml의 namespace와 일치시킨다.
- mapper interface의 메서드 이름, 파라미터는 mapper.xml의 태그 아이디, parameterType과 일치시킨다.

이렇게 하면 SqlSessionTemplate을 통해서 하던 호출 작업은 적절한 추정을 통해서 MyBatis가 자동으로 처리한다. 따라서 명시적으로 등록했던 SqlSessionTemplate도 불필요해진다.
XXRepoImpl 제거
이제 CountryRepoImpl은 불필요해졌으므로 삭제하거나 뭔가 아깝다면 @Repository를 주석 처리해서 빈으로써의 지위만 박탈해버리자.
// @Repository
public class CountryRepoImpl implements CountryRepo { . . . }
@MapperScan
이제 @Repository 클래스 즉 구현체가 없는데 어떻게 동작시킬 것인가? 스프링에게 mapper interface의 위치만 알려주면 이후는 내부적으로 proxy를 만들고 알아서 처리한다.
mapper interface의 위치를 지정할 때는 @Configuration에 @MapperScan을 통해서 mapper interface의 위치를 지정할 수 있다.
@Retention(RetentionPolicy.RUNTIME)
@Target(ElementType.TYPE)
@Documented
public @interface MapperScan {
  @AliasFor("basePackages")
  String[] value() default {};
  @AliasFor("value")
  String[] basePackages() default {};
  Class<?>[] basePackageClasses() default {};
}
그리고 스캔될 개별 mapper interface에 @Mapper 를 추가한다.(optional)
@Mapper
public interface CountryRepo {
    int insert(Country country);
    ...
}
이제 단위테스트를 다시 실행해보면 RepoImpl이 있을때와 동일하게 동작함을 확인할 수 있다.
단일건 조회
select는 여러 건의 데이터가 반환되는 목록 조회(0 건 이상)와 Primary Key를 이용하는 단일건 조회(0 or 1건) 두 종류로 나눌 수 있다.
먼저 primary key를 이용하는 단일건 조회에 대해 살펴보자
mapper.xml
다음은 Country 테이블의 primary key인 Code를 이용한 select 태그의 예이다.
<select id="select" resultType="country" parameterType="string">
    select * from country where code=#{code}
</select>- 새로 추가된 속성으로 resultType이 있는데 쿼리 실행 후 결과가 담겨서 반환될 타입을 의미한다. resultType의 종류 및 사용법은 parameterType과 동일하다.
- parameterType으로는 string이다. 따라서 sql 문장에서 전달된 파라미터를 사용할 때는 아무런 값을 써도 무방하다.
- 조회 결과를 매핑하기 위한 작업이 없이 바로 DTO에 설정되는 것은 매우 편리한 일이다.
mapper interface
mapper interface에는 위 태그와 연결하기 위해 다음의 메서드가 필요하다.
public interface CountryRepo {
    int insert(Country country);
    // PK를 이용한 단일건 조회
    Country select(String code);
}
만약 CountryRepoImpl을 사용한다면 아래와 같이 select를 override 한다. P.K를 이용한 조회를 처리할 때에는 selectOne을 사용한다.
@Override
public Country select(String code) {
    return template.selectOne(ns+"select", code);
}
단위테스트 수행
단위테스트로 결과를 확인해보자.
@Test
public void selectTest() {
  Country country = cRepo.select("KOR");
  assertEquals(country.getName(), "South Korea");
}
select는 transaction을 유발하지 않기 때문에 @Transaction은 사용할 필요가 없다.
목록 조회
이번에는 여러 건의 데이터가 반환될 수 있는 목록 조회의 경우를 살펴보자.
mapper.xml
Country 테이블의 limit를 이용해서 from 부터 cnt 개의 데이터를 조회하기 위한 태그를 구성해보자.
<select id="selectRange" resultType="Country" parameterType="map">
    select * from country limit #{from} , #{perPage}
</select>
limit는 mysql에서 paging의 기초가 되는 구문이다. 파라미터로 전달된 map에는 from과 perPage가 키 값으로 설정되어 있어야 한다.
mapper interface
위 태그를 사용하기 위한 mapper interface의 메서드는 다음과 같다. 여러 건의 데이터를 반환 받아야 하기 때문에 return type이 List<Country>로 선언된 점을 주목하자.
List<Country> selectRange(Map<String, Object> condition);
CountryRepoImpl을 유지한다면 아래와 같이 selectRange를 override한다. 여러 개의 결과를 가져올 때는 selectList를 사용한다.
@Override
public List<Country> selectRange(Map<String, Object> condition) {
    return template.selectList(ns + "selectRange", condition);
}
단위테스트
테스트를 수행하고 원하는 결과가 오는지 확인해보자.
@Test
public void selectRangeTest() {
    Map<String, Object> condition = new HashMap<>();
    condition.put("from", 50);
    condition.put("perPage", 5);
    List<Country> selected = cRepo.selectRange(condition);
    assertEquals(selected.size(), 5);
}
조회 결과 원하는 범위의 값만 반환함을 알 수 있다.
자료 수정
다음으로 update 문장을 처리해보자.
mapper.xml
<update id="update" parameterType="Country">
update country
set Name=#{name}, Continent=#{continent}, Region=#{region}, SurfaceArea=#{surfaceArea},
    IndepYear=#{indepYear}, Population=#{population}, LifeExpectancy=#{lifeExpectancy},
    GNP=#{GNP}, GNPOld=#{GNPOld}, LocalName=#{localName}, GovernmentForm=#{governmentForm},
    HeadOfState=#{headOfState}, Capital=#{capital}, Code2=#{code2}
where Code=#{code}
</update>
태그가 자료 수정을 의미하는 update인 점만 주의하면 일반적인 sql의 update 문장이다.
mapper interface
insert 때와 유사하게 int 를 반환 받는 구조로 작성한다.
int update(Country country);
만약 mapper interface의 impl을 유지한다면 아래처럼 override 한다.
@Override
public int update(Country country) {
    return template.update(ns + "update", country);
}
단위테스트
다음으로 단위테스트를 수행한다.
@Test
@Transactional
public void UpdateTest() {
  Country country = cRepo.select("KOR");
  country.setName("newName");

  cRepo.update(country);

  Country selected = cRepo.select("KOR");
  assertEquals(selected.getName(), "newName");
}
update는 DML 문장이기 때문에 @Transactional 하에서 수행해야 테스트 후 rollback이 수행된다. 테스트 개요는 먼저 code가 KOR인 데이터를 조회 후 name을 'newName'으로 변경한 후 수정한다. 다시 KOR을 조회했을 때 수정한 name인 'newName'이 조회된다면 성공이다.
자료 삭제
마지막으로 delete를 처리해보자.
mapper.xml
<delete id="delete" parameterType="string">
    delete from country where code=#{code}
</delete>
태그의 이름이 delete인 점만 주의하면 일반적인 sql이다. 여기서는 parameterType이 string이므로 단일 값이다. 따라서 #{} 내부에는 아무런 이름이나 사용할 수 있다.
mapper interface
다음은 mapper interface에 선언되는 메서드 이다.
int delete(String code);mapper interface impl을 유지한다면 아래와 같이 재정의 한다.
@Override
public int delete(String code) {
    return template.delete(ns+"delete", code);
}
단위테스트
마지막 단위테스트를 살펴보자.
@Test
@Transactional
public void deleteTest() {
  Country country = new Country("ATL", "Atlantis", "Africa");
  int result = cRepo.insert(country);
  Assertions.assertEquals(result, 1);
  result = cRepo.delete(country.getCode());
  Assertions.assertEquals(result, 1);
  country = cRepo.select("ATL");
  Assertions.assertNull(country);
}
Delete 역시 DML이기 때문에 @Transactional에서 단위테스트를 처리한다.
테스트 시나리오는 먼저 ATL 에 해당하는 데이터를 삽입 후 delete를 호출해서 삭제한다. 다시 ATL에 해당하는 데이터를 조회해보면 null이 나오면 정상이다.(삽입이나 조회는 앞서 테스트 했기 때문에 의심할 필요가 없다.)
'MyBatis' 카테고리의 다른 글
| [MyBatis] 05. 기타 (0) | 2023.06.18 |
|---|---|
| [MyBatis] 04. 동적 쿼리 (1) | 2023.06.18 |
| [MyBatis] 03. 조회 결과의 매핑 (0) | 2023.06.18 |
| [MyBatis] 01. 소개 및 환경 설정 (2) | 2023.06.18 |
| Spring + mybatis + PageHelper (5) | 2020.06.23 |
Contents
소중한 공감 감사합니다